Sunday, October 12, 2014

How to Reset Forgotten Safe Mode Password

Forgot the administrator password and can't log into Windows Safe Mode? This tutorial shows you how to use PCUnlocker to reset forgotten Safe Mode password with ease. This method works with all versions of Windows, including Windows 8.1.

Part 1: Create A PCUnlocker Live CD/USB Drive

PCUnlocker exists of a CD image, which needs to burned to a blank CD or USB drive. Before resetting Safe Mode password, you need to use a spare PC to make a PCUnlocker Live CD/USB drive.
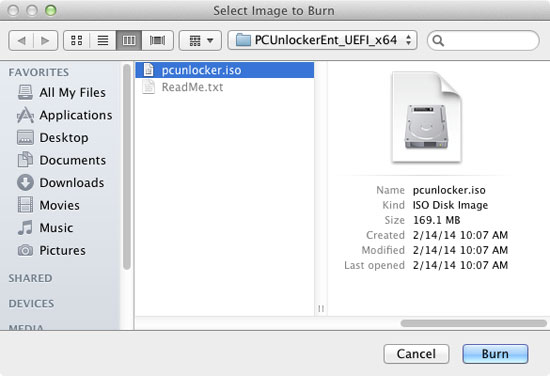
  1. Download and save the PCUnlocker self-extracting Zip file to your desktop, then extract the ISO image file: pcunlocker.iso from the ZIP file.
  2. Download and install the ISO2Disc utility, a free ISO burning program.
  3. Launch the ISO2Disc program. Click on Browse button to locate the pcunlocker.iso file, then click the Start Burn button to burn the ISO image to a blank CD or USB flash drive.
    Burn ISO Image to USB flash drive

Part 2: Change Boot Order in BIOS
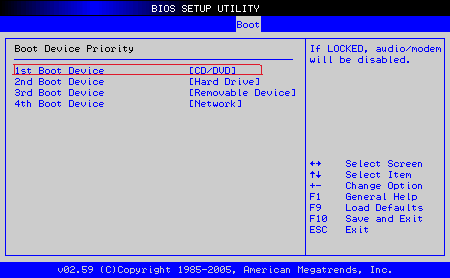
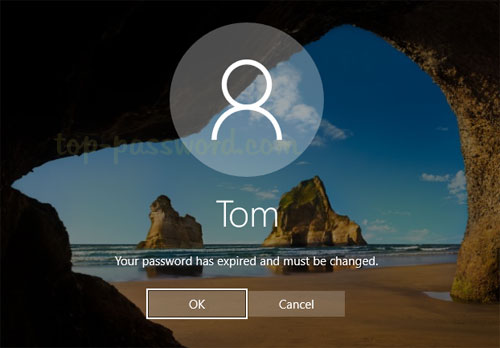
  1. Inset your newly created CD or USB drive into the computer with Safe Mode password you want to reset. When it is powered on, check the boot-screen for setup key (i.e. DELETE key, F8 key, F2 key) to enter BIOS Setup Utility.
  2. Use the arrow keys to select the BOOT tab, then change the Boot Device Priority: Set 1st Boot Device to CD/DVD. If your created media is a USB drive, set 1st Boot Device to Removable Device.
  3. Press F10 to save your changes.
Part 3: Reset Safe Mode Password
  1. After successfully booting from the CD/USB drive, the computer will load the WinPE operating system and take you directly to the PCUnlocker program.
  2. Simply select your Windows SAM registry hive if multiple operating systems have been installed on the computer, the program will list the Windows user accounts.
    Reset Windows Password
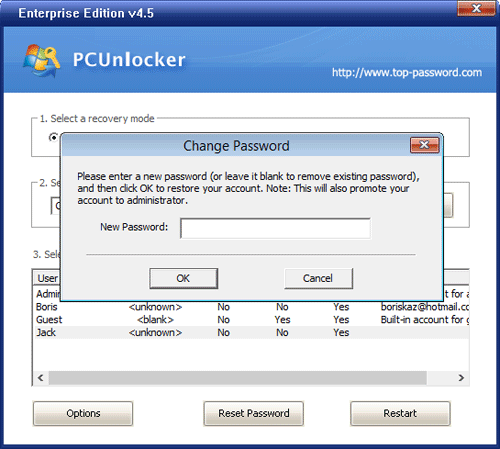
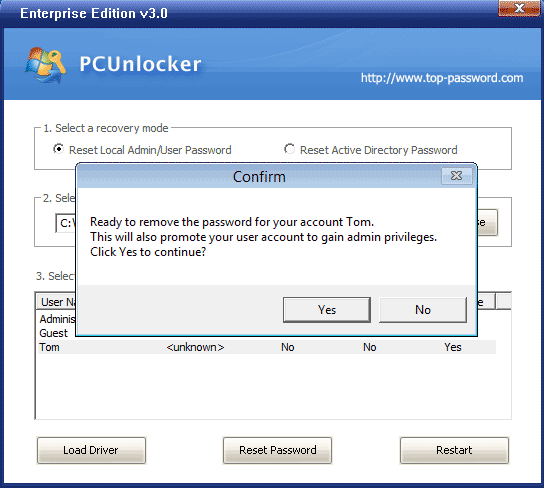
  3. Select the Administrator account and click the Reset Password button. This will enable / reset your Safe Mode password instantly.
  4. Remove the CD or USB drive and reboot your computer to Safe Mode, you can then log into the built-in administrator account without a password! For domain controller, you can also boot into Directory Services Restore Mode (DSRM) and login!

Monday, July 28, 2014

Windows XP Logon Password Hacking

Forgot the administrator password and couldn't log on to your Windows XP system? PCUnlocker is an amazing bootdisk that can help you remove Windows XP logon password, and unlock a disabled, locked or expired user account.

To get the software to work, you will need to make a PCUnlocker Live CD from another computer. Boot your locked Windows XP system from the Live CD and you can easily hack forgotten logon password in the Security Accounts Manager (SAM). These instructions are written assuming a bootable CD is being used, but are essentially the same for a bootable USB drive.

How to Hack Windows XP Logon Password?
  1. Download the PCUnlocker software using an alternative computer. Once downloaded, extract the ISO file (pcunlocker.iso) from the ZIP file.
  2. Next download and install ISO2Disc, a freeware for making bootable CD or USB drive. Run the ISO2Disc program, click on Browse button to select the PCUnlocker ISO image.
    Create a PCUnlocker Live CD
  3. Choose your CD/DVD recorder and click on Start Burn to make a PCUnlocker Live CD.
  4. After you've created a PCUnlocker Live CD, put it in the CD drive of the locked Windows XP computer you want to hack the password for.
  5. Power on the computer and quickly press the key indicated in the POST screen (i.e. DELETE key, F2 key, F12 key) to enter BIOS Setup. The exact key depends on your computer – if you don't see the appropriate key displayed on your screen, consult your computer's manual.
  6. Once you're in the BIOS Setup, go to the Boot menu. Change the boot sequence and set your computer to boot from CD/DVD first.
    Change boot order in BIOS
  7. Press F10 to save your changes and exit the BIOS.
  8. The computer will then restart from PCUnlocker Live CD. After a while, you'll see the PCUnlocker program and it shows you a list of local accounts stored in the Security Accounts Manager (SAM).
    Reset Windows Password
  9. Choose a user and click Reset Password button, the program will unlock / hack Windows XP logon password immediately.
  10. Now take out the Live CD. The next time you boot, Windows XP will load up on its own without asking for a password. If you're on a multi-user computer, the logon screen will still appear after starting Windows XP but when you click on the user that had the password removed, you will not be prompted for a password and will instead enter Windows automatically.
If you don't see your desired user on the Windows XP Welcome screen, press Ctrl+Alt+Del twice to display the classic logon dialog and you will be able to type both user name and password.

Saturday, June 28, 2014

Change Windows 7 Password without Knowing Original Password

Need to change Windows 7 password because you've forgotten the original password? As you all know without knowing the current password we are unable to change Windows password. Today I am going to tell you two ways to change Windows 7 password without knowing original password.

Option 1: Change Windows 7 Password from Command Prompt


This is an especially handy trick if you want to change a password on an account but you've forgotten the old password (going through the Control Panel can require confirmation of the old password). You need to have admin access to perform this change from the command line.
  1. Open an elevated Command Prompt. Click on Start button, go to All Programs -> Accessories and right click on Command Prompt and select "Run as Administrator" from context menu.
  2. You can use the net user command to change Windows password easily, without supplying the old password:
    net user username  new_password
    Replace username with your Windows account name, and new_password with your desired new password.
    change windows password from command prompt
If you're totally locked out of Windows, you're unable to run any program such as command line tool to change your password. In this situation, you need to use a bootable media to change Windows password.


Option 2: Change Windows 7 Password with PCUnlocker


PCUnlocker is a bootable utility that can reset the password of any Windows user account. It works with all versions of Windows, including Windows 8, 7, Vista and XP. Follow these steps and you can change Windows password without knowing old password:
  1. First of all, you need to use another PC to download the PCUnlocker program, which comes as a bootable CD image. Burn the ISO image to a blank CD or USB drive using the ISO2Disc utility.
  2. Insert the newly burned CD or USB drive into your target computer, and set it to boot from CD/USB.
  3. Once you've booted into the CD/USB drive, you'll be presented with the screen of PCUnlocker. This program automatically locates the SAM database file for your installed Windows operating system, and shows you a list of local user accounts.
    Reset Windows Password
  4. Select a user account and click on Reset Password button. It will remove your old password immediately. Restart the computer and you can then log into your Windows account without typing a password!

Thursday, June 5, 2014

How to Unlock Sony Vaio Laptop If Forgot Windows 7 Password

Locked out of your Sony Vaio laptop and can't login to Windows 7? How can I access Sony Vaio if I have forgotten the password? Problem begins when ever you not having the password reset disk with you or not yet created. Even though it seems a huge problem, it is still not so tough to bypass Windows 7 password.

Here I'm going to explain how to reset Sony Vaio Windows 7 password with PCUnlocker Live CD or USB drive. This method works with all Sony Vaio laptops and tablets, including UEFI-based computers.

Part 1: Create A PCUnlocker Live CD/USB Drive
  1. Before resetting Sony Vaio password, you need to use another computer to make a PCUnlocker boot media. Simply download the trial version of PCUnlocker Enterprise, unzip the downloaded file and you'll get an ISO image file called pcunlocker.iso.
  2. Next download and install the freeware ISO2Disc. Run the ISO2Disc program, click on Browse button to select the PCUnlocker ISO image. Create a bootable PCUnlocker USB drive
  3. To make a PCUnlocker Live CD, simply select Burn to CD/DVD and click on Start Burn. However, if you don't have a blank CD at hand, you can make a bootable USB drive: Choose your USB drive and then click on Start Burn.
Part 2: Reset Sony Vaio Windows 7 Password
  1. Plug the USB drive into a USB port of your Sony Vaio laptop, or put the CD in the optical drive if you’ve created a Live CD.
  2. When the computer is turned off, press the Assist button at the top of the keyboard, and you're greeted with Sony's VAIO Care utility. Sony's VAIO Care utility
  3. Select the Start from media (USB device/optical disc) [F11] option to proceed. Now the computer starts to boot from the CD or USB drive.
  4. After one or two minutes, you'll see the PCUnlocker program and it shows you a list of local accounts existing on your Sony Vaio laptop. Reset Windows 7 Password on Sony Vaio
  5. Choose a local account and then click Reset Password button, it will reset your forgotten password immediately.
Restart your computer and disconnect the PCUnlocker boot media. You can then log in to your Windows 7 system without a password. With this boot media you can also reset Sony Vaio Windows 8 password with ease.

Friday, May 9, 2014

How can Mac Users Reset Forgotten Windows Password

Forgot Windows password on a laptop but your only other computer that you have access to is a Mac? Don't panic. Just create a PCUnlocker Live CD on your Mac and you can then use it boot off Windows machine for resetting lost admin password.Follow these steps and you can reset Windows password from Mac.

How can Mac Users Reset Forgotten Windows Password?
  1. Click here to download and save the PCUnlocker program on your Mac OS X. The downloaded file is a self-extracting zip archive which contains a WinPE-based ISO image called pcunlocker.iso.
  2. Double-click on the .zip file you have downloaded, Archive Utility should appear and automatically extract your files. Once the files have been extracted, you can find the pcunlocker.iso file in a folder located in the same location as the original .zip file.
  3. Insert a blank CD into your computer's optical drive.
  4. Open Finder and navigate to Applications -> Utilities and double-click Disk Utility.
  5. Once the Disk Utility is launched, click the Burn button at the top of Disk Utility in the toolbar.
  6. Choose the pcunlocker.iso file from the pop up window. Click on Burn and confirm your operation. Sit back and wait while your new disc gets written!
  7. Insert the CD into the CD drive of your locked Windows computer. Boot the computer from the CD.
  8. Once the WinPE operating system inside the CD is loaded into memory, the PCUnlocker application will start. It displays a list of local user accounts that are detected from your Windows SAM database.
  9. Choose your administrator account and click on Reset Password button. It will reset your forgotten Windows admin password immediately.
  10. Click Restart to reboot your computer and remove the CD. You can then log in to your Windows administrator account without a password. Done!

Tuesday, April 29, 2014

Reset Lost SA Password in SQL Server 2008 Express

Lost or forgot your SA password? The SA account got locked out or disabled after too many login attempts? Don't panic. With SQL Server Password Changer you can reset SA password and unlock your SQL Server account easily. In this tutorial I'll show you how to unlock / reset SA password in SQL Server 2008 Express.

How to Reset SA Password in SQL Server 2008 Express?

The SA login is stored in the master database (master.mdf) file, but this file is inaccessible while SQL Server is running. To unlock SA account in SQL Server, you need to first stop your SQL Server instance, and then install SQL Server Password Changer on your local computer.

Start the SQL Server Password Changer program. Click on Open File button and select the master database (master.mdf) for your SQL Server instance. By default, the master.mdf file resides in the following location:

C:\Program Files\Microsoft SQL Server\MSSQL10.SQLEXPRESS\MSSQL\DATA

After you've chosen the master database file, the program will analyze the file format and extract all database users from it. Choose the SA account and click on Change Password button. In the pop-up window, enter your desired new password and click OK.


The program will assign your new password to the SA account, and also enable / unlock the SA account when it is disabled or locked out. Start your SQL Server instance and you can then successfully connect to your SA account using your new password. Done!

Monday, April 14, 2014

How to Bypass Windows 7 Password without CD

Forgot your Windows 7 administrator password and don't have a CD or USB drive at hand? In this tutorial we'll show you a simple way to Bypass Windows 7 password without CD.

Of course, if you do have a PCUnlocker Live CD, you can bypass your password the easy way with a few mouse clicks. The following trick works with local account only. If you're using a Microsoft Account to login to your computer, you can also use PCUnlocker to reset lost Microsoft Account password.

How to Bypass Windows 7 Password without CD?
  1. Turn on your computer. While the computer is coming up and you can see it saying "Starting Windows". Hold down the Power button for at least 5 seconds to force power off your computer.
  2. When a sudden power loss is detected, the next time you turn on your computer and it will ask you if you want to launch startup repair or start normally. Choose the Launch Startup Repair (recommended) menu.
  3. Startup Repair will boot up and take a little while. When it asks you if you want to restore your computer to an earlier point, click Cancel.
  4. The Startup Repair Tool begins analyzing startup log files for clues as to the source of the problem and then launches a series of diagnostic tests to determine the cause of the startup failure. After a long time, you will get a dialog saying that Startup Repair cannot repair this computer automatically! Click on View problem details.
  5. Now scroll down to the end of the Detail Report. Click on the last link to read Microsoft's offline privacy statement.
  6. Notepad will come up with the privacy statement in it. Click on the File menu and then Open.
  7. In the File Open dialog box, change the Files of type option to All Files. Browse to the Sticky Keys application – C:\windows\system32\sethc.exe. Rename this file as a backup file: I named it "sethc-copy".
  8. Now find the cmd.exe file in the same folder. This is your Command Prompt. rename it to sethc.exe. Then close out of all the dialog boxes and Finish, so that the computer restarts.
  9. Once you get to the Windows login screen, hit the Shift key 5 times and it will open the Command Prompt window instead of the Sticky Keys application.
  10. Now to reset the password – just type the following command, replacing the username and password with the combination you want:
    reset user top-password.com 123456
  11. Close the Command Prompt and you should be able to log on to Windows with your new password.
That's it! You've successfully bypass Windows 7 password without a CD.

Wednesday, March 26, 2014

How to Recover Chrome Stored Password on Your Own

How to recover the stored passwords from Chrome browser? There are situations that we need to export Chrome stored password, and transfer the saved password to a new Chrome installation on another computer.

With all versions of Google Chrome, the passwords are stored in a small SQLite database which contains a table named logins. The passwords is, obviously for security reasons, not stored in plain text. Rather, they are encrypted, so we need to use a Google Chrome password recovery tool to recover saved Chrome passwords.

In this article I'll walk you through the steps of recovering Chrome stored password with Password Recovery Bundle. The program could be used to retrieve passwords from Internet Explorer, Firefox, Apple Safari, Opera, SeaMonkey and Chrome.

To get started, download and install Password Recovery Bundle on your computer. After installing, start the program and click on "Start Recovery" button. This program will display a list of password recovery options.


Navigate to the "Chrome Password" option and click on it. The program will automatically search the SQLite database that is used by Google Chrome to stored password, and then decrypt the login information and show you all saved passwords immediately.

Sunday, March 23, 2014

How to Recover SeaMonkey Saved Password with Ease

Can I recover email account password from SeaMonkey? Forgot the password stored in SeaMonkey but you need to use your email account on another computer? Don't worry! There is an easy way to decrypt and extract passwords from SeaMonkey profile. With the Firefox Password Recovery program you can recover SeaMonkey password easily!

Firefox Password Recovery is small utility that allows you to recover saved passwords from Mozilla Firefox, Thunderbird, SeaMonkey, Flock. Here we'll walk you through the process of recovering SeaMonkey saved passwords.

How to Recover SeaMonkey Saved Passwords?
  1. Download the setup package of Firefox Password Recovery program on your computer.
  2. Once you've downloaded it, double-click the setup file to install it.
  3. Start the Firefox Password Recovery program. Click on the Start Recovery button, it will provide you with 5 recovery options.
  4. Choose the Recover SeaMonkey Password option. It will automatically find your SeaMonkey profile and retrieve all the saved passwords of your email accounts immediately.

Thursday, March 13, 2014

Windows Password Expired and Can't Log Into Windows

Windows password expired and can't log into Windows? Many of you might have seen the message "Your password has expired and must be changed" at log-on, if you haven't changed Windows user password for a long time.


In this tutorial we'll show you two options to disable the password expiration for a Windows user account in Windows 8, 7, Vista or XP. So the password expiration notification will never appear again at login.


Option 1: Disable Password Expiration with Command Prompt


This method requires you to log on Windows with admin rights. Password expiration can promote system security by forcing you to change your password on a regular basis. But in certain circumstances it may cause some inconvenience. Follow these steps you can turn off password expiration for all Windows accounts:
  1. Open an elevated Command Prompt. In Windows 8 or 8.1, you can press the Windows and X keys together and then click on Command Prompt (Admin).
  2. At the Command Prompt, simply run the following command which sets your Windows password to never expire.
    net accounts /maxpwage:unlimited
Someone may suggest you to use this command: net user Administrator /expires:never. But this will set your account to never expire, NOT the password. You can find out the differences by reading this article: Differences Between User Account Expiration and Password Expiration.


Option 2: Remove Password Expiration with PCUnlocker


Can't log in after your Windows password expires? Or Can't change the expired password because you've forgotten the old password? Just boot your computer from PCUnlocker Live CD, you can reset an expired password for any Windows user account.
  1. Download the PCUnlocker program using another computer. The download file is self-extracting .zip archive which contains an ISO image.
  2. Extract the ISO image from the zip file, and then burn it to a blank CD (or USB flash drive) using any CD burning program such as ISO2Disc or ImgBurn.
  3. Put the CD in the CD drive of the computer with an expired Windows password. Change the boot order in BIOS and get the computer to boot from CD.
  4. After booting into the CD, the PCUnlocker program will start and it displays a list of Windows local accounts on your system. Choose an expired account and click on Reset Password button.
  5. The program will remove the password and also set your account password to never expire.
Besides resetting an expired Windows password, you can also use PCUnlocker to unlock a disabled or locked user account in Windows 8, 7, Vista and XP.

Sunday, March 9, 2014

Things to Backup Before Reinstalling Windows 7

If your PC has been infected by a virus or has become slow to the point of being unusable, reinstalling Windows may be the best and quickest solution. But I always forget something like backing up product keys and email accounts. So, you are probably wondering what to backup before reinstalling Windows. Here's a checklist of the things you should do before you make a clean install of Windows. Well, let's take a look.


Stored Logins and Passwords

If you are using your browser to store the passwords for Web sites, you will be in for a rude awakening after reinstalling Windows – they will be gone. Your browser is a poor place to keep your website logins and passwords. Besides backing up website passwords, you might also need to export your email account settings (POP3, SMTP and passwords), and passwords stored in your FTP software, instant messengers and other applications.

If you can't remember your passwords, you can take use of the Password Recovery Bundle program. This program can help you retrieve stored passwords from all popular instant messengers, email clients, web browsers, FTP clients and many other applications. After recovering, write down and back up them in a safe place because you need them after you reinstall Windows.

A List of Programs and License Keys

Reinstallation of Windows means that you are putting a new copy of the operating system on your hard drive, which will essentially delete all of the programs you installed. In order to restore your original settings and to know what programs you need to reinstall later, you might want to create a list of all the programs on the computer before reinstalling Windows.

Some of your core apps or drivers may be on DVD, CD, or comes as an ISO image. Pull out your media and set it in a stack ready for reinstallation later. It’s also important to keep track of valuable license keys for your Windows, Office or other programs installed on the local machine. While you can do this manually by typing the license keys up in a text document, there is a very easy way to do this, especially if you have KeyFinder Plus installed on your computer. All you need is to open KeyFinder Plus, click on the "Start Recovery" button then click "Save To File" and choose where you want to save it. From here, you can then back up all your license keys in a single file.

Emails, Address Book and Bookmarks

If you store your emails and your email address book on your PC via an email client, then you will want to back up your e-mail and address book before reinstalling Windows. This applies to you if you use a program like Outlook, Lotus, or Thunderbird. If you use a web-based email client like Gmail or Yahoo Mail, then you won't have to worry about this. Also, if you would like to keep the bookmarks for your favorite Web sites, then you should back these up as well.

Important Documents, Video Files and Photos

Most people don't want to lose their important photos, videos, or documents when reinstalling Windows. Before reinstalling Windows, make sure you backup all the important video and audio files as well as pictures to your storage media (DVD, USB drive or external hard drive) where they cannot be tampered with. By default, Windows will store these in sub-folders under the "My Documents" or "Documents" folder.

Conclusion

The above list is just about what you need to backup before installing Windows. However, you can also take an image of your whole hard drive using Norton Ghost so you won't lose anything.

Saturday, March 8, 2014

How to Bypass Windows 7 Login / Logon Screen

Tired of having to type in a password every time you want to log into Windows? Forgot Windows password and didn't know how to get back on your computer? In this tutorial we're going to show you how to bypass Windows 7 login screen and gain access to your computer without entering a password.

How to Bypass Windows 7 Login Screen?

If you're the only person with access to your computer, you can have Windows boot straight to the Desktop without prompting you for a login password. It's easy to bypass Windows login screen and the instructions below will show you how to do it.

Step #1: Press Windows + R to open the Run command, type netplwiz or control userpasswords2 and press Enter.


Step #2: Under the Users tab, uncheck the Users must enter a user name and password to use this computer option, click Ok.


Step #3: Now enter the existing password in Automatically Log On dialog window, click OK, restart your Computer.


You won't be prompted to enter your password next time you turn on or restart your computer.

Forgot Windows 7 Password? How to Bypass Windows 7 Login Screen?

The method above requires you to know the existing Windows password on your computer. How to bypass Windows login screen if you forgot your password? In this situation, you need to remove your forgotten Windows password in order to bypass Windows login screen. Follow these step-by-step instructions:

Step #1: Download the PCUnlocker program and save it on an alternate PC which you have full access to. Unzip the download file and you'll get the pcunlocker.iso file. Burn the ISO image to an empty CD (or USB flash drive) using ISO2Disc program.

Step #2: Simply insert the CD into your locked computer and restart it. You may have to call up the boot menu by pressing F12 or something, but it may automatically boot from the CD drive you inserted.

Step #3: Once the computer boots up from the CD, it will open up the PCUnlocker program. Select a user account and then click on "Reset Password" button. It will remove Windows 7 password instantly.

Step #4: Remove the CD and restart the computer. Normally the computer will then boot directly into the Desktop without requiring you to enter a password. However, the Windows login screen might still appear even if you are using a blank password. If you're that case, just press OK to log on your computer. After getting into Windows, you can use the method above to enable automatic logon feature.

Friday, March 7, 2014

How to Bypass BIOS Password on HP, Dell, Acer, Lenovo, Toshiba, Asus, Samsung, Song Computers

Lost or forgot your BIOS password? Without the password, you can't access BIOS to change boot order. This also means you can't change the boot order to boot into a CD or USB drive. Luckily you can bypass BIOS password by just removing the CMOS battery from the motherboard for a few moments and then putting it back in. However, this is not the case for some computers and you may also need to change the jumper settings. This trick can be used to remove BIOS password on Acer, Dell, HP/Compaq, Toshiba, Asus, Gateway, Samsung, Lenovo, Sony and Apple computers.

Warning: There is a risk of hardware damage and of personal injury. Follow this procedure exactly to avoid personal injury. Not all motherboards have removable CMOS batteries. If the battery won't come loose, don't force it.

How to Remove BIOS Password Using The Jumper Settings?
  1. Shut down the computer and then unplug the power cable.
  2. Disconnect all external devices and wait about 15 seconds.
  3. Press and hold the Power button while your computer is unplugged to dissipate static electricity from the motherboard.
  4. Before touching anything inside your computer, ground yourself with a wrist-grounding strap or by touching an unpainted metal surface, such as the metal at the back of your computer. While you work, periodically touch an unpainted metal surface to dissipate static electricity.
  5. Open up your computer case and remove the CMOS battery.
  6. Locate the password jumper on the motherboard, look for the letters PWD, PSWD, PSWDCLR, CLEAR CMOS, CLEAR, CLR, JCMOS1 or PASSWORD. The jumper is typically located on the edge of the motherboard or physically near the CMOS battery.
  7. To remove the BIOS password, you will need to change the jumper settings.
    • If there are 3 pins under the jumper, moving the jumper over one pin will change it. For example if the jumper is covering pins 1 and 2, move it so that it is covering pins 2 & 3. If the jumper is covering pins 2 and 3, reinstall the jumper over pins 1 and 2.
    • If there are only 2 pins under the jumper, simply remove the jumper from the pins.
    bios-jumper
  8. Put the CMOS battery back in and close the case.
  9. Reconnect the power cable and turn on your laptop. The BIOS password should be cleared. After the Windows logon screen appears, turn off your laptop again.
  10. Disconnect the power cable. Press and hold the power button for 10 seconds to release static electricity from the system. Replace the jumper to its original position. Close the case and the computer is ready to be used again.

This method works well for desktop computers, however this is not practical for laptop users unless the warranty expired long time ago. BIOS password can add an extra layer of security for desktop and laptop computers but it is different from a Windows admin password. If you forgot Windows admin password, you need to take use of PCUnlocker Live CD to remove it.

Thursday, March 6, 2014

3 Option to Unlock Windows 7 Administrator Password

Hi there, so you forgot Windows 7 password, and now you are wondering how to unlock your computer? You are in the right place, and to comfort you up a little bit, you are not unique on this matter. There are a lot of people that for some reason forget the login password on their computers, and most of the time the answer they find all over the Internet is to reformat the hard drive, and reinstall Windows. This is not the answer you will get here, I will share my own 3 ways to help you unlock Windows 7 administrator password. let's proceed.

Method 1: Use Password Reset Disk

A password reset disk could really come in handy if you ever forgot Windows 7 password. The problem with this method is that you have to create the password reset disk before the password is lost. Assuming that you have created it in advance, then you can use this method to reset Windows 7 password easily.
  1. Once you've typed the wrong password, Windows 7 will show a Reset password link below the login box.
  2. Click on the link. Make sure that password reset disk is plugged into the computer at this point.
  3. When the Password Reset Wizard appears, click Next to continue.
  4. Select the right password reset disk. Click Next.
  5. Type in a new password and a hint for the password. Click Next.
  6. Click Finish. Now you can log in to your PC with the new password.

Method 2: Using Other Available Administrative Account

But unlike Windows XP, the built-in Administrator account in Windows 7 is disabled or hidden by default. If you are able to log in your computer with other available administrative account, it's quite easy for you to reset forgotten Windows 7 password as follows:
  1. Type lusrmgr.msc in the Start search box and hit Enter to pop up the Local Users and Groups window.
  2. Expand Users folder to display all the user accounts in the Windows 7 machine.
  3. Right-click the account whose password you forgot and select Set Password. Reset Administrator Password
  4. Click Proceed to go on your operation.
  5. Type and confirm your new password and click Ok.

Method 3: Reset Windows 7 Password by Third-party Software
  1. Download the self-extracting Zip file of PCUnlocker package.
  2. Uncompress the package, there is a ISO image: pcunlocker.iso. Burn it onto a CD/DVD or USB flash drive.
  3. Boot your locked computer from the newly burned CD/DVD or USB flash drive.
  4. Wait until the boot process is finished. When a window pops up with all your Windows accounts, select the target one to remove your forgotten password.Reset Windows Password

Re-installing Windows 7 is always an option, but we consider that a last resort. Installation will help you remove forgotten Windows password, but also erase your important data on computer. So don't try this method unless you don't have other solutions.

Monday, March 3, 2014

Lost Admin Rights on Windows 7 User Account

Lost admin rights / privileges on your Windows 7 user account? If you can't access the administrator account, or your administrator account was demoted to a guest or limited account, you will be restricted from performing any administrative tasks.

In this tutorial we'll explain how to regain your PC's administrator rights with PCUnlocker. PCUnlocker is a bootable utility that could be used to promote a limited / standard user account to administrator, or unlock / reset your forgotten administrator password on Windows 8, 7, Vista and XP.

Part 1: Create A PCUnlocker Live CD/USB Drive

  1. Click here to download and save the PCUnlocker self-extracting Zip file to a folder on your hard drive, then extract the ISO image file: pcunlocker.iso from it.
  2. Insert a blank CD or USB flash drive into your computer. Download and install the freeware ISO2Disc.
  3. Start the ISO2Disc program. Click the Browse button to locate your ISO image file, then click the Start Burn button to burn the ISO image to your CD or USB flash drive. Burn ISO Image to CD/DVD or USB flash drive

Part 2: Boot Your Locked PC from CD/USB Drive

  1. Connect the burned CD or USB drive to the computer that you're trying to gain admin rights on. When it is powered on, check the boot-screen for setup key (i.e. DELETE key, F8 key, F2 key) to enter BIOS Setup Utility.
  2. Use the arrow keys to select the BOOT tab, then change the Boot Device Priority: Set 1st Boot Device to CDROM if you just created a bootable CD or DVD, or set 1st Boot Device to Removable Device if a bootable USB flash drive was created. BIOS Setting
  3. Press F10 to save your changes. Now your computer will restart and then boot from PCUnlocker Live CD/USB drive. If you still can't get your computer to boot from the CD/USB drive, please refer to this boot up troubleshooting guide.

Part 3: Gain Admin Rights on Windows 7 Account

  1. After the computer boots up from the CD or USB drive, it will start the PCUnlocker program which shows you a list of local accounts that are stored in Windows SAM registry hive. Select your user account and click on Reset Password button. Gain Admin Rights on Windows Account
  2. Click Yes to confirm your operation. The program will remove your user password, promote your account to an administrator if it's a standard or limited account, and enable / unlock it when necessary.
  3. Click Restart to reboot the computer and remove the CD or USB drive. You can then log into your Windows 7 administrator-level user account without a password.
It's so easy to get admin rights back on your Windows 7 account and regain full control of your computer. I hope this will also help you in case you lost admin rights on Windows 7.

How to Reset Lost Admin Password of A Windows 7 VM Running in VMware

I have a Windows 7 VMware image whose admin password is forgotten. How can I reset or recover the password? Or do I need to rebuild a new machine?
If you ever lost your Windows 7 password, that could be a very heart wrenching feeling. Don't Panic! This process works for both physical machines as well as Virtual VMware Images. I'll take you through the steps to reset VMware password:

Step 1: First, download the PCUnlocker program from here and save it on your host machine. The download file is a self-extracting archive which contains an ISO image: pcunlocker.iso.

Step 2: Shut down your Windows 7 VM and attach the PCUnlocker ISO image to the virtual CD/DVD drive.

Step 3: Now you need to change the boot order in BIOS. To make it easier to access the BIOS setup screen, edit the virtual machine's configuration (.vmx) and add or edit one of these options:

bios.forceSetupOnce = "TRUE"

Step 4: When your VM instance boots, you will be in the BIOS. Change the BIOS settings so that your VM Image first boots from the CDROM. Save your changes and exit.

Step 5: During booting, PCUnlocker will start automatically and you'll see a list of system user account. Select the user you want to clear the password and clear (delete) that password.

Step 6: Click on "Restart" button to quit this program and then shut down your VM instance.

Step 7: Edit the *.vmx file again and change: bios.forceSetupOnce = "TRUE" to bios.forceSetupOnce = "FALSE". Save your changes.

Step 8: Restart your VM instance and you can then log back into Windows 7 without a password!

Saturday, March 1, 2014

Recover Windows 7 Admin Password without Admin Rights

There is only one administrator account on your Windows 7 laptop but you forgot the password? How can I recover the password without administrator rights? With PCUnlocker Live CD you can regain your computer's administrator privileges, even if you don't have the password. To get started, you need to make a PCUnlocker Live CD/USB drive on an alternate PC. Afterwards, you can then use it to boot off your locked computer and change Windows administrator password easily. Here are step-by-step instructions.


Part 1: Create A PCUnlocker Live CD/USB Drive

  1. Click here to download and save the PCUnlocker self-extracting Zip file to a folder on your hard drive, then extract the ISO image file: pcunlocker.iso from it.
  2. Insert a blank CD or USB flash drive into your computer. Download and install the freeware ISO2Disc.
  3. Start the ISO2Disc program. Click the Browse button to locate your ISO image file, then click the Start Burnbutton to burn the ISO image to your CD or USB flash drive. Burn ISO Image to CD/DVD or USB flash drive


Part 2: Boot Your Locked PC from CD/USB Drive

  1. Connect the burned CD or USB drive to the computer that you're trying to gain admin access. When it is powered on, check the boot-screen for setup key (i.e. DELETE key, F8 key, F2 key) to enter BIOS Setup Utility.
  2. Use the arrow keys to select the BOOT tab, then change the Boot Device Priority: Set 1st Boot Device to CDROM if you just created a bootable CD or DVD, or set 1st Boot Device to Removable Device if a bootable USB flash drive was created. BIOS Setting
  3. Press F10 to save your changes. Now your computer will restart and then boot from PCUnlocker Live CD/USB drive. If you still can't get your computer to boot from the CD/USB drive, please refer to this boot up troubleshooting guide.


Part 3: Recover Windows 7 Administrator Password

  1. Shortly after the computer boots up from the CD/USB drive, you'll see the PCUnlocker screen. Reset Windows Password
  2. The program will show a list of local accounts that are stored in Windows SAM registry hive. Select the administrator account and click the Reset Password button to remove your forgotten password.
  3. Click the Restart button to reboot the computer and remove the CD or USB drive. You can then log into Windows administrator account without a password.

PCUnlocker can also be used to change administrator password on Windows Server 2012/2008/2003/2000. I hope this guide helps you out if you ever forget your administrator password and need to regain administrator privileges.

Thursday, February 27, 2014

Lost Windows 7 Password? Here’s How to Bypass It

Losing Windows 7 password could be a nightmare that will leave you without access to your system. This could happen out of forgetfulness, the result of idiotic roommates with nothing better to do, or any number of other situations that could result in a total loss of access to your computer. But don't worry! Here we'll show you an easy way to bypass Windows password after you lost your password.
All you really need is a USB drive and another computer to create a PCUnlocker Live USB drive on. In many cases, you can bypass lost Windows 7 password in just a few minutes.

Lost Windows 7 Password? How to Bypass It?
  1. First, you are required to create a PCUnlocker Live USB drive from another computer that you have access to. This can be your work PC, or a friend or family member's PC (any PC within your reach). Download the ISO image of PCUnlocker and burn it to your USB drive using ISO2Disc program.
  2. Insert the PCUnlocker Live USB into your own machine and boot the computer from it. Before that ensure you have set your BIOS to boot from USB drive. After successfully booting from PCUnlocker Live USB, it will load the operating system that is installed on the USB drive.
  3. When the boot process is complete, it will start the PCUnlocker program. This program automatically searches your Windows installations and displays all user accounts existing in Windows SAM registry file. In the list box, you can also find out which user account is password protected, disabled or locked out.
  4. Choose one of your user accounts and click on "Reset Password" button. The program will bypass your lost Windows 7 password instantly.
  5. Restart the computer and disconnect the Live USB. The account that you're trying to regain access to will no longer require a password. Quickly get back into your system without data loss!

How to Gain Admin Access to Windows 7 from Standard User Account

Accidentally demoted your administrator account to a standard user and can't get admin rights on your computer? Forgot the administrator password after setting up Parental Controls for your child's account? With a standard user you are unable to install any programs. When you try the "net user" command to reset admin password, you'll get the "access denied" error.

In this article I would like to walk you through using a tool to gain admin access to your Windows 7 from standard user account. This method works on nearly all versions of Windows, including Windows 8, Vista and XP.

How to Gain Admin Access to Windows from Standard User Account?

Step 1: First, you need to use another computer to download the zipped ISO image of PCUnlocker. Extract the downloaded file locally and then burn the resulting .iso file to a CD-ROM (or USB flash drive) using ISO2Disc program.

Step 2: Insert the CD into the computer that you're trying to gain admin access to and boot from it. You may have to change the computer’s boot order in the BIOS in order to boot from the CD.

Step 3: If you boot from the CD successfully, the computer will load the contents of the CD drive, and eventually start the PCUnlocker program. This program automatically detects your Windows installation and displays all Windows user accounts which are stored in the SAM registry hive.

Step 4: Choose your standard user account and click on "Reset Password" button. You will get a confirmation dialog like the one shown below:


Step 5: Click Yes to continue. The program will remove your current password and promote your standard user account to administrator immediately.

Step 6: Now everything finish properly and you have to remove the CD and restart your machine. After logging into your standard user account, you'll find that your user account has already been joined into the administrators group. Now you've successfully gained admin access to your system and you can perform any administrative tasks on your computer.